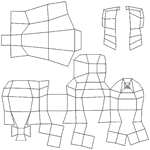
How to Export an UV Guide
Thursday 25 May 2023


|

|
- Create a white image of the desired texture size (in Photoshop)
(Ex: 2048px * 2048px image UVBase.pic or .tga) - Drag and drop the image in one view (viewport) of XSI
- In the texture editor for the object, whose you want to export the UVs
- In 'Clips' / 'All Clip' select > 'UVBase.pic' to put the white image in background of the Texture Editor
- Uncheck :
- [ ] Dim Image
- [ ] Highlight Overlaps ou Odd Overlaps
- [ ] Highlight Coverage
- [ ] Show Connectivity
- In 'Files' / 'Preferences' > in 'Colors' tab :
- UV mesh who is Yellow, switch his color in Black
- Do not select the object's UVs
- In 'Edit' > 'Stamp UV Mesh'
- Save the image in . pic . tga or .jpg (uncompressed)
All this gives you a picture in B / W with UV lines in Black and background in White, usable in product mode or another blending mode in Photoshop.
no comment


